What does DR ABC stand for?
DR ABC stands for Danger, Response, Airway, Breathing and circulation. DR ABC attempts to assess the level of first aid that the injured person requires. First aiders should follow the steps broken down into d-r-a-b-c which is easily remembered as DR ABC.
First Aider Role
The Health and Safety (First-Aid) Regulations 1981 require employers to provide suitable first aid within the workplace. The role of a First Aider can be diverse, but, the primary responsibility will always be to preserve life.
First Aiders are responsible for:
- Assessing the situation
- Protecting the casualty from danger
- Getting help for the casualty
- Prioritising treatment of multiple or individual casualties
- Minimising the risk of infection
- Preventing further injury
- Promoting Recovery
This is not the conclusive list, however, it gives you a good idea of the role and responsibilities of the First Aider.
What does this mean?
The primary objectives of DR ABC:
- Preserving Life
- Preventing Further Injury
- Promote Recovery
These are considered the 3P’s. The primary concern should always be to preserve life. Secondly, prevention of further injuries should be next as you want to minimise the amount of damage done to the person in order to finally promote a healthy recovery.
Danger
You must always assess the situation before taking any steps of first aid. The danger that caused the casualty to become injured in the first place, could still be there which may result in yourself becoming injured and unable to help. For example, a road traffic accident presents a risk as there are moving vehicles on the road that could also injure you. Once the situation has been assessed and is safe, the next steps can be carried out. Never proceed with First Aid or any of the further steps if there is danger present that could leave you injured as well.

Response
The second step is to attempt to prompt a response from the casualty so that they can tell you what is wrong with them. There are a few levels of responsiveness that can be used to assess their state as well. You must check if the casualty is:
Alert – Are they able to move or talk to you to state what has happened? If not you must escalate.
Voice – Attempt to speak to the casualty clearly and loudly, remaining in the casualty’s eye line so that they can see who is talking. Attempt to prompt a response from the casualty. If there is no response, then escalate the response again.
Pain – The casualty may be responsive to a pain stimulus, so at this point you should consider induces a small amount of pain to the casualty to rouse a reaction. Pinching the ear, applying pressure to the fingernail or pinching the skin between the thumb and forefinger should rouse a reaction from a casualty who is responsive.
Unresponsive – At this point, the casualty is unresponsive.
You may need to prompt a response from the casualty if they are not responding. This can be done by speaking loud and clearly into the casualty’s ear.
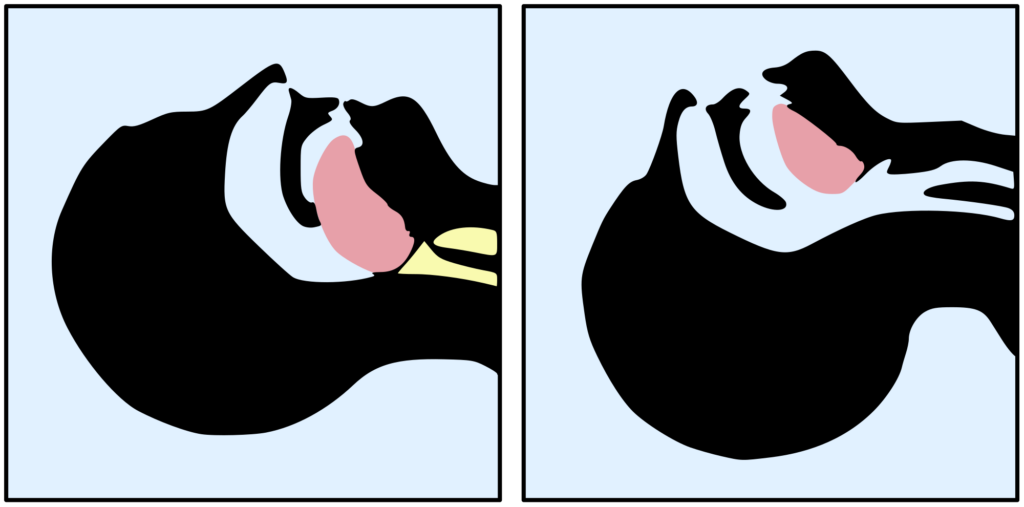
Airways
If the casualty is unresponsive, you must check their airways. If they have responded verbally and clearly, then their airways will be clear, however, you need to keep checking that their airway is clear.
To ensure the airway is clear, you must perform a chin lift. To do this: Place your hand on to the person’s forehead and gently tilt their head back, lifting the tip of their chin using two fingers. This will move the tongue away from the back of the throat otherwise the tongue will block their airway. Do not lift the head using the hand placed on the forehead. You must always lift from the chin when performing this technique.
Possible airway issues include airway swelling or narrowing. An airway blockage could be caused by:
- The tongue
- Vomit
- Anaphylaxis (Allergic reaction)
- Burns
- Choking
- Strangulation
- Hanging
Breathing
You must check that the casualty is still breathing. To do this you can use one of 3 methods:
- Observe the chest to see if it rises and falls. This indicates that the casualty is breathing.
- Listen over their mouth and nose for breathing sounds.
- Place your cheek close to their mouth and feel for breath for a maximum of 10 seconds.

If the casualty is able to breathe, ensure that their airway stays clear and continue monitoring their breathing.
As you all probably know, you need a constant oxygen supply to survive. Oxygen is so important to us that if our brain cells don’t get oxygen for 3 – 4 minutes, they will begin to die. This can cause brain damage and further brain injuries if the casualty is to survive.
Please note that irregular breathing/gasps are not normal breathing. If the casualty isn’t breathing, call 999 or 112 for an ambulance. This is called agonal breathing which the emergency service operator will understand and can be used in order to reduce the panic levels of the casualty or others around whilst describing the situation.
Circulation
Once breathing has been established with the casualty, you must then move on to check for any signs of severe bleeding. If the casualty is severely bleeding, apply pressure to the wound and call 999/112 to get emergency help.
If the casualty is not bleeding, and have no pulse, start CPR immediately, and call for somebody to bring the nearest defibrillator kit.
Potential reasons for a circulatory issue include:
- Heart Attack
- Heart Failure
- Severe Bleeding
- Poisoning
- Anaphylaxis
- Cardiac Arrest
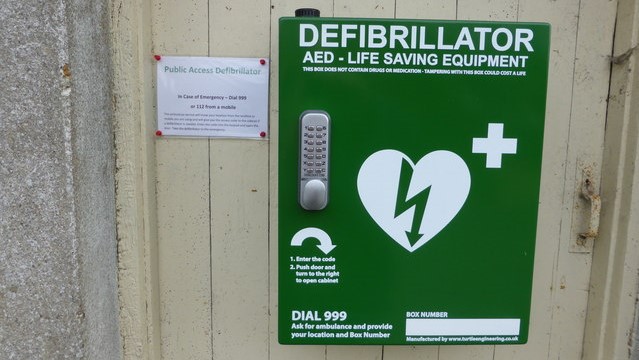
Defibrillation
Defibrillators can be found in many public places and many businesses. Within the kit you will find:
- Face covering for CPR
- Trauma Shears for clothing
- Razor for any chest hair
- Rubber gloves
An AED kit will walk you through the process of defibrillation with clear instructions. To use an AED device you must:
- Cut through the casualty’s clothing using the trauma shears provided within the AED kit. This is to clear any obstruction as the AED pads will not work through clothing. In the event that the casualty has thick chest hair, use the razor to remove the hair in the area in which the pad will be placed. Wipe the sweat from the chest area.
- Remove the pads from the packaging and observe the images on the packaging. The images will indicate where to place the pads. You must always choose the correct pads as the AED kit will contain child and adult pads which will not work if used in reverse.
- Once the pads are placed on the casualty correctly, the AED device will begin reading the heart rhythms. When the device instructs you to deliver a shock to the casualty, all people in the area must keep away and must not touch the casualty. The AED device will continue to instruct you and will instruct you to give CPR at points. Only touch the casualty when instructed by the AED device.
First Aid Courses
This all sounds great, and putting it into practice in the workplace is essential in the event of an injury in the workplace.
Every workplace must have a registered First Aider on-site.
Here at SB Skills, we offer a range of first aid courses which will prepare you in the event of an injury. Read about our first aid courses here.
Error: Contact form not found.